
- Summary of this article
- About SSDs and Secure Erase
- Preparing to Run Secure Erase
- TxBench is free software that can perform a secure erase
- Performing Secure Erasing
- Let's run a benchmark before performing a secure erase
- I tried to perform a Secure Erase, but… (This cannot be performed if the Windows system partition is included.)
- Delete a volume using the diskpart command
- Command Explanation
- Let's take a look at the state of the SSD after deleting the partition
- Try Secure Erase again using TxBench
- Final Confirmation Before Secure Erase
- Secure Erase Complete
- I tried running a benchmark after performing a secure erase, but the only option available was “RAW mode.”
- Run the benchmark again after creating the volume
- Benchmark Comparison Before and After Secure Erase
- In Closing
Summary of this article
In this article, I’d like to explain how to securely erase an SSD.
By reading this article, you’ll learn the specific steps for securely erasing an SSD using a Windows PC.
About SSDs and Secure Erase
In recent PCs, models equipped with SSDs (solid-state drives) have become the norm, replacing traditional HDDs (hard disk drives). SSDs offer significantly faster read and write speeds compared to HDDs.
As a result, upgrading your PC’s storage from an HDD to an SSD is a modification whose benefits are relatively easy to notice.
Data on an SSD cannot be completely erased using the same method as with an HDD
SSDs are built using a different mechanism than traditional HDDs. Therefore, to completely erase the data inside an SSD, methods such as “filling the entire storage area with zeros or random numbers (overwriting it)”—as is done with HDDs—are not sufficient to ensure complete data erasure.
In other words, simply overwriting the data with zeros or random numbers may give the false impression that the data has been erased, but if you dispose of the SSD or SSD-equipped computer as trash or return it to a leasing company, there is a risk that this could lead to a data breach.
What is Secure Erase?
The “Secure Erase” method is commonly used to completely erase data from an SSD. Secure Erase is a data erasure function that renders data stored in the SSD’s flash memory unreadable.
The execution of Secure Erase is often restricted by the operating system
While Secure Erase is essential when disposing of SSDs or PCs equipped with SSDs, the reality is that it cannot be performed casually due to security concerns.
If it were easy to execute, people with limited PC knowledge might inadvertently run Secure Erase and unintentionally erase their data, or it could provide malicious actors—such as computer virus creators—with a means to delete data from others’ PCs.
Therefore, a restriction known as a “freeze lock” is set when attempting to run Secure Erase on an SSD. To execute Secure Erase, this freeze lock must be unlocked.
However, in Windows 8 and later, for example, it is not possible to unlock the freeze lock on SSDs connected via internal interfaces such as SATA. This means that Secure Erase cannot be executed on a drive while the OS is running, and this restriction applies to all drives connected via internal interfaces.
Secure Erase is available for external SSDs
As mentioned earlier, it is difficult to perform a Secure Erase on an SSD connected to an internal interface such as SATA. Therefore, by using a USB adapter cable instead of the internal interface to make the PC recognize the SSD as an external drive, you can perform a Secure Erase.
Performing a secure erase may also help restore the SSD’s performance
Running Secure Erase restores the SSD to its factory settings, including blocks marked as “unusable” on the drive. As a result, the SSD’s original performance may be restored.
Preparing to Run Secure Erase
Now, let’s go through the specific steps for performing a Secure Erase on an SSD running Windows 11.
The USB external enclosure I prepared
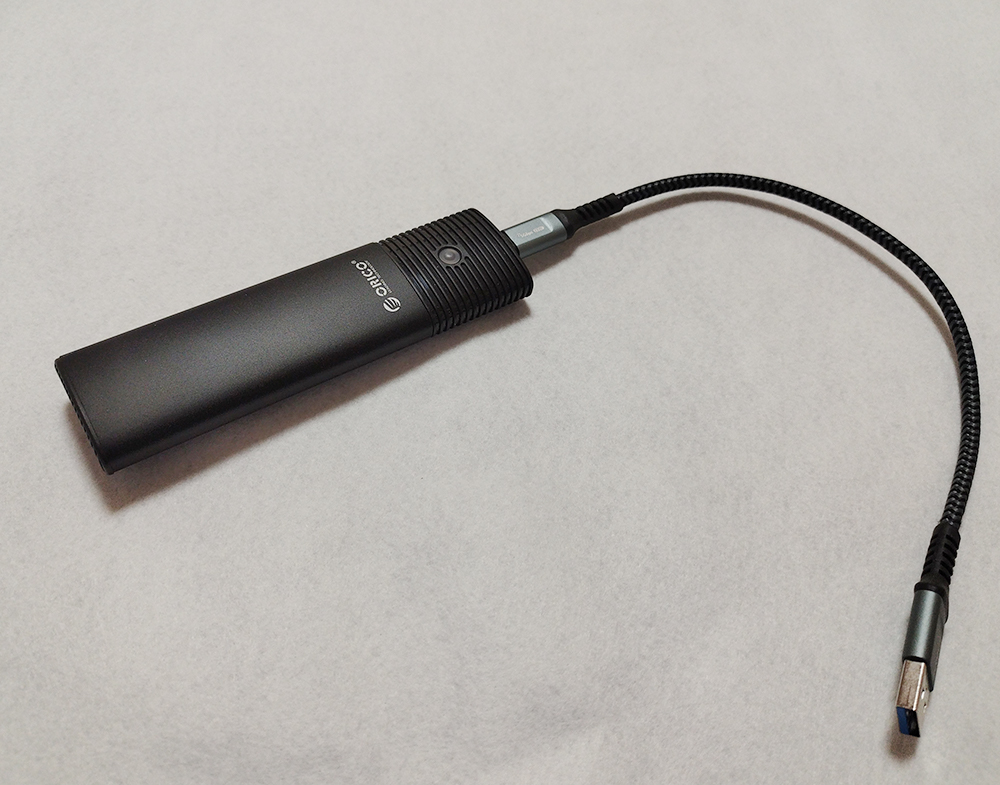
To perform a Secure Erase, I have prepared an external enclosure with a USB 3.2 connection. I will use this enclosure to perform a Secure Erase on a 256GB M.2 SSD.
Software for performing a secure erase
There are two software options available for performing a Secure Erase on an SSD.
Use the official software provided by the SSD manufacturer
Some SSD manufacturers provide SSD erasure tools, which can be downloaded from their official websites or through other means. Transcend is one such manufacturer. If your SSD manufacturer offers a Secure Erase tool, using that official tool is the simplest and most reliable option.
One point to keep in mind is that official tools provided by manufacturers are often compatible only with that manufacturer’s SSDs.
Use free software
If your SSD manufacturer does not provide a tool for Secure Erase, you can also perform Secure Erase using free software. In this guide, we will use a free program called “TxBENCH.”
TxBench is free software that can perform a secure erase
TxBench is free software that allows you to perform a Secure Erase on an SSD. I downloaded it from the URL below.
!https://www.vector.co.jp/soft/winnt/hardware/se504391.html
Performing Secure Erasing
Let’s run a benchmark before performing a secure erase
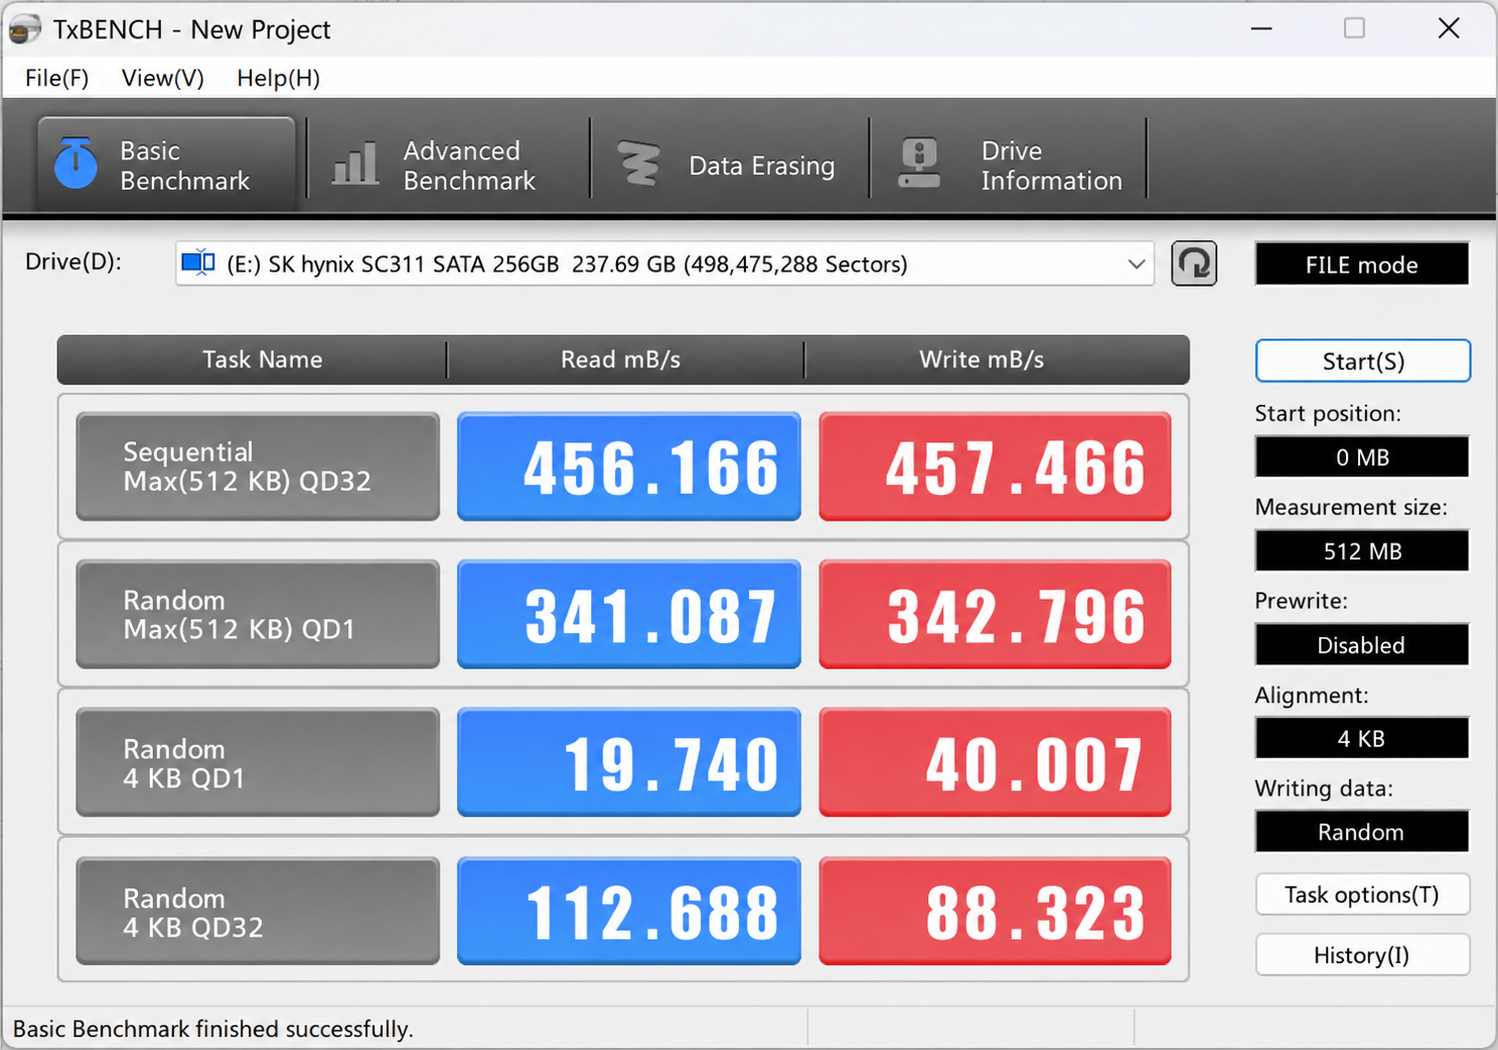
The results of the basic benchmark conducted prior to the Secure Erase are shown in the figure above.
I tried to perform a Secure Erase, but… (This cannot be performed if the Windows system partition is included.)
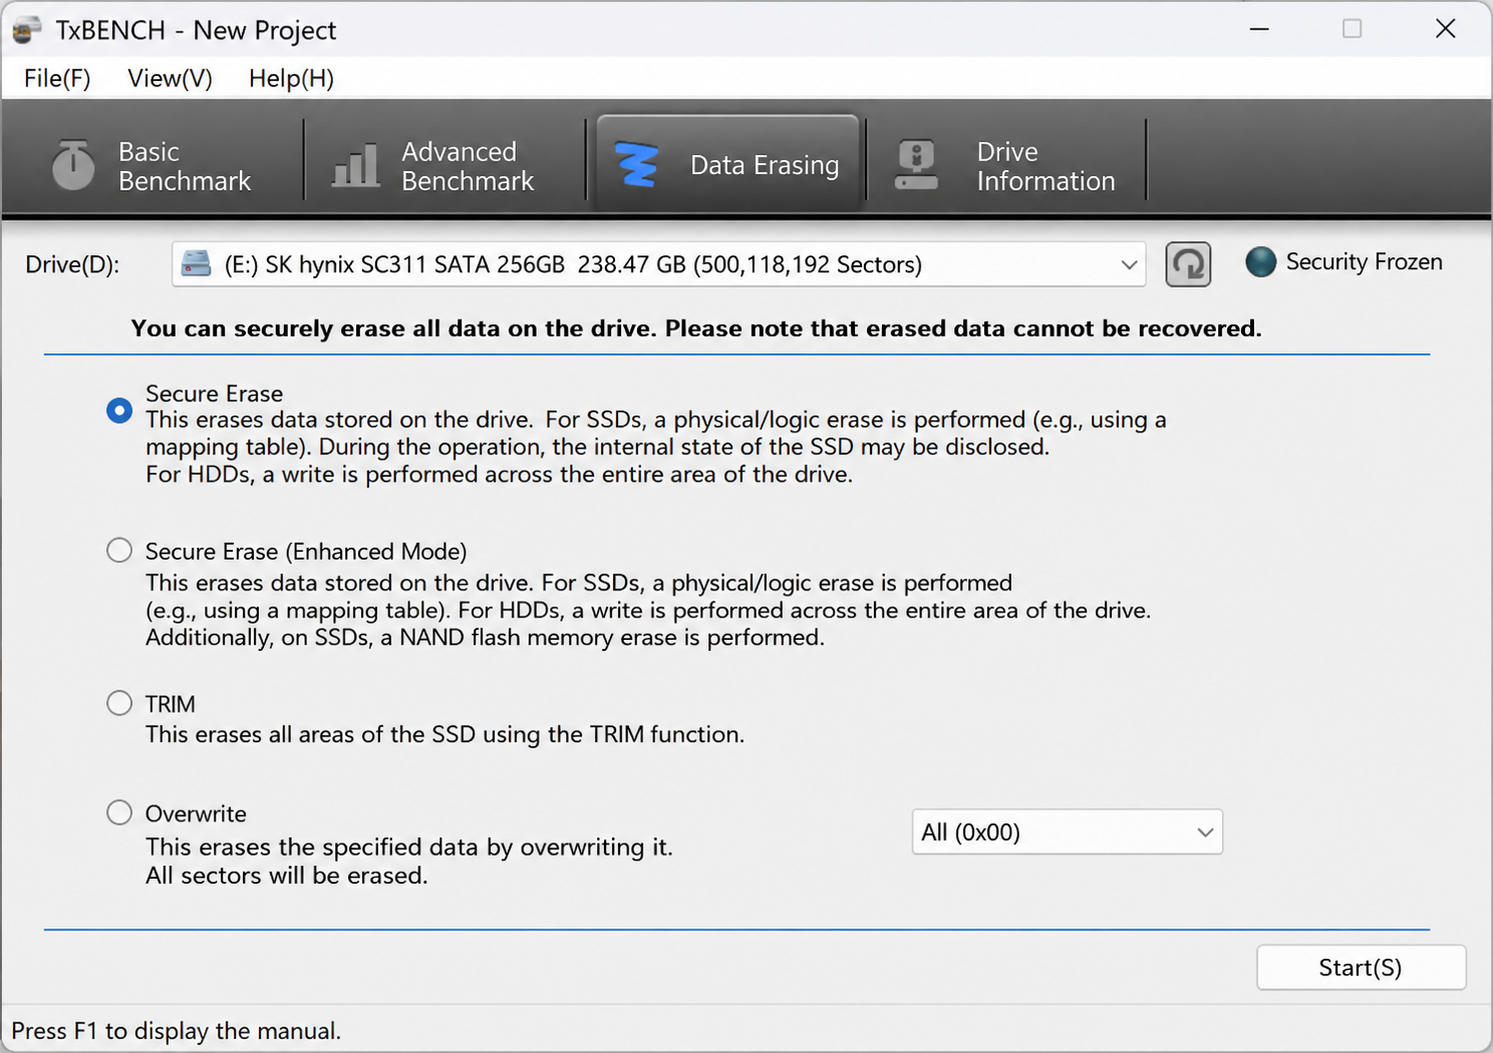
n the “Data Erasure” tab of TxBench, select the SSD you want to perform a Secure Erase on from the drop-down menu and click “Start”…
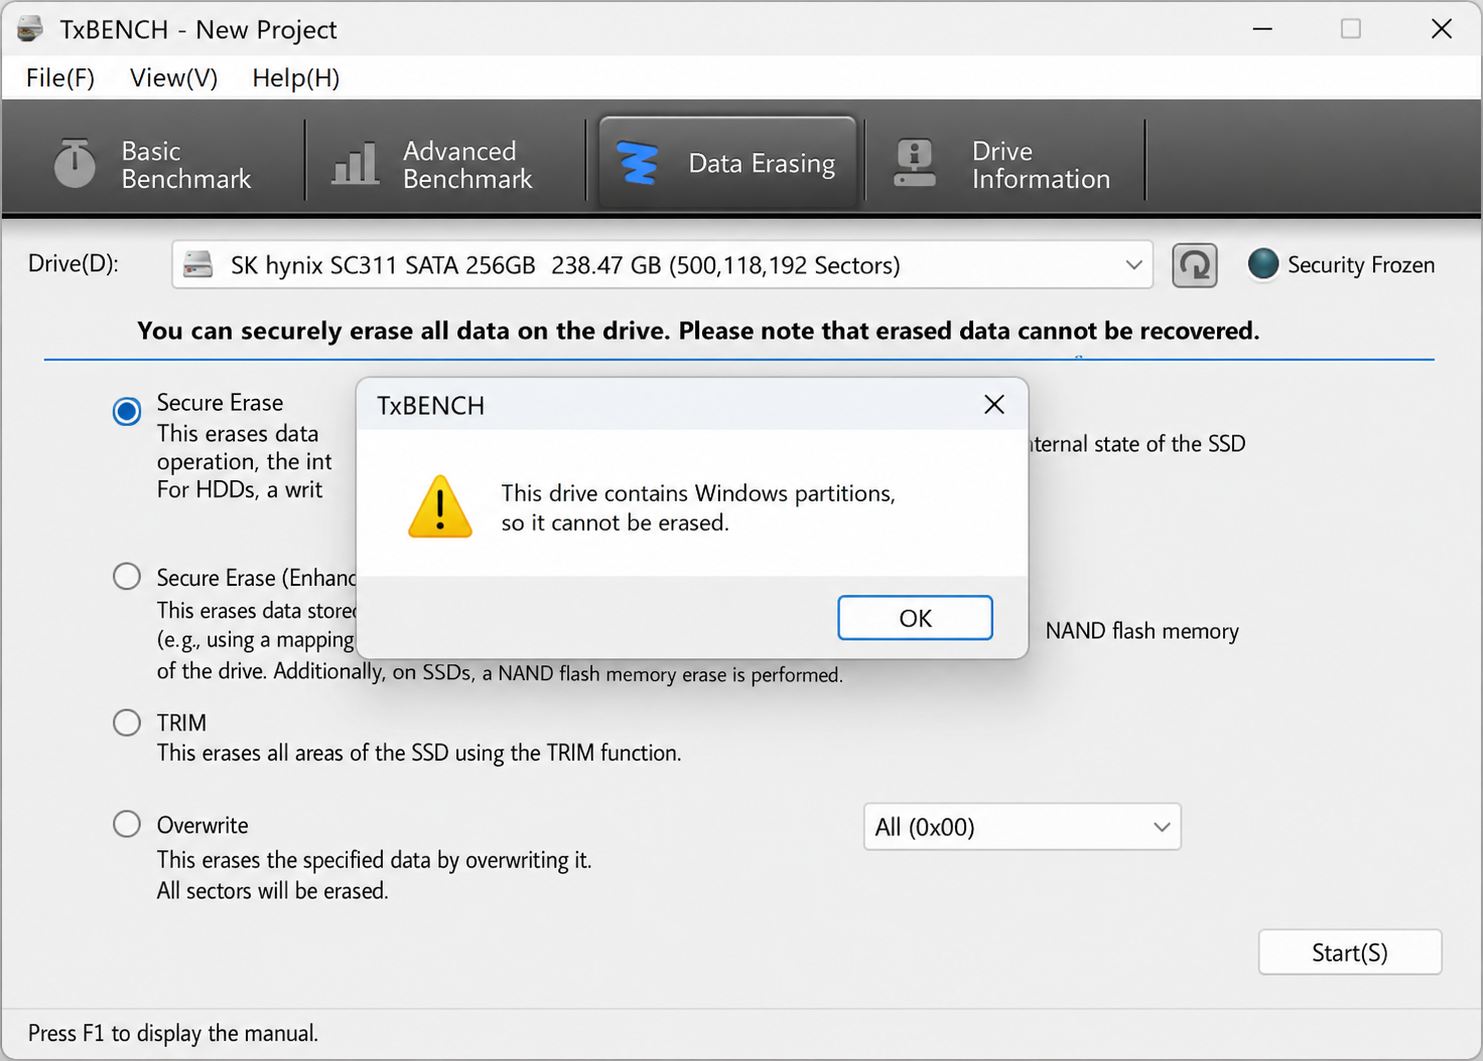
Since I had previously used this SSD as the boot drive for a Windows PC, it contains the Windows system partition. In this case, a warning appeared as shown below, preventing me from performing a Secure Erase.
Delete a volume using the diskpart command
*Please note that if you make a mistake when using the diskpart command, data that should not be deleted may be erased, so you must exercise extreme caution.
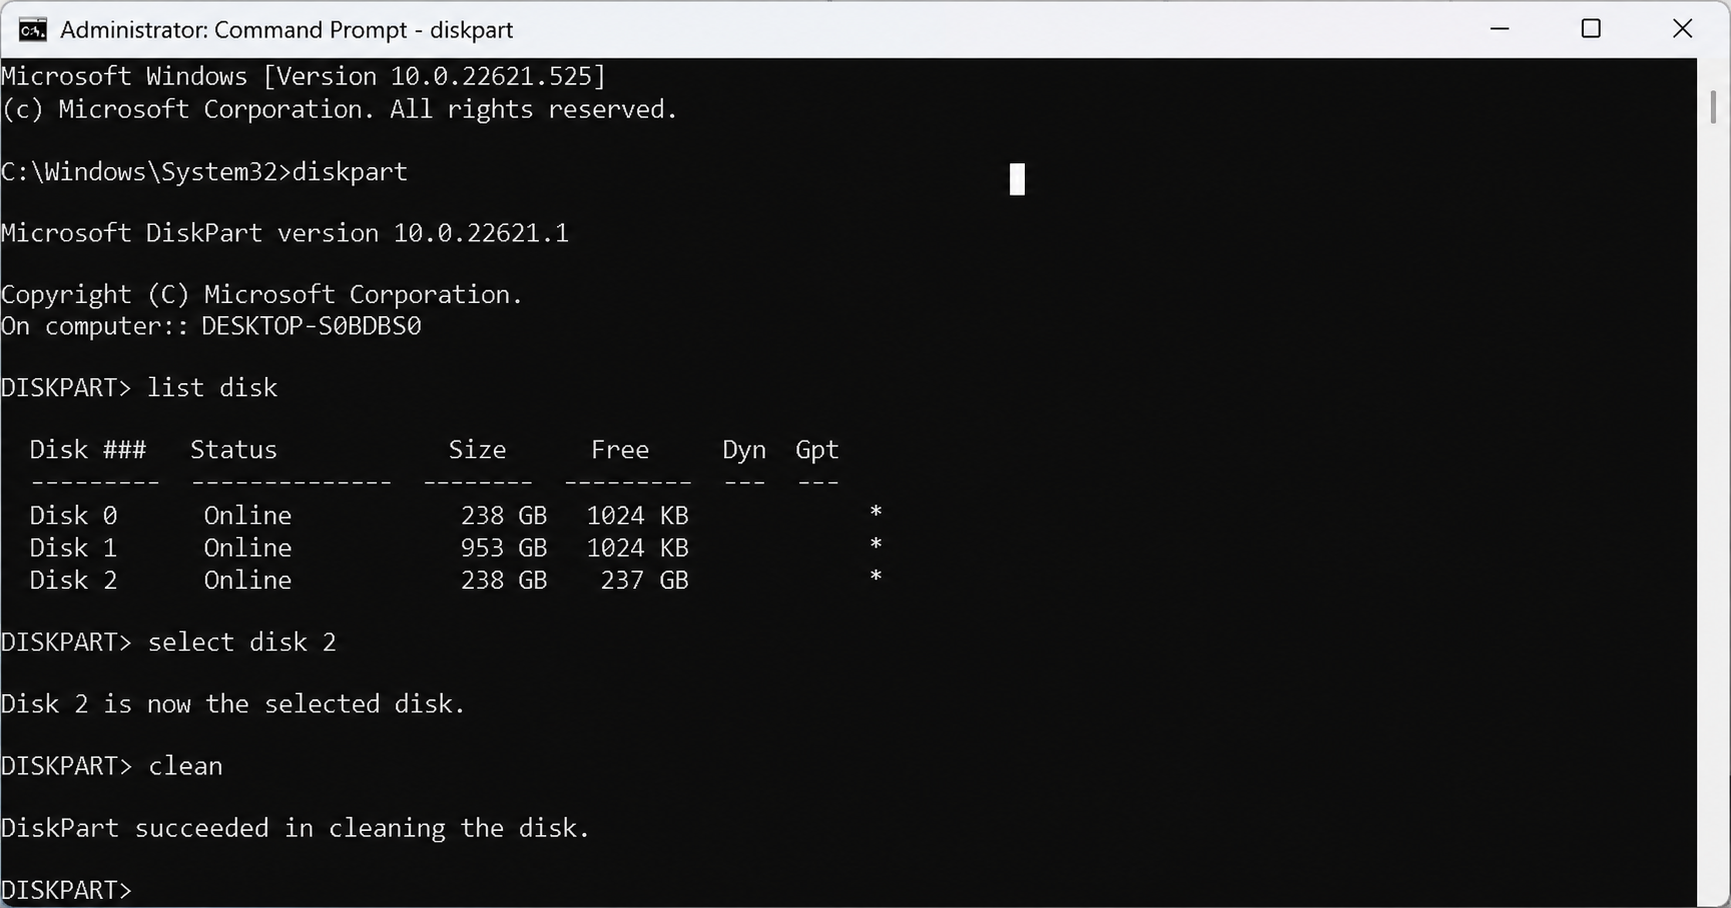
So, as shown in the figure above, we’ll use the Windows diskpart command to delete the partition on the SSD.
Command Explanation
list diskUse the “list disk” command to display a list of all drives currently recognized by your PC. This is an important step to help prevent selecting the wrong drive.
select disk ◯The “select disk [disk number]” command selects a specific drive by specifying its drive letter.
cleanThe “clean” command deletes partition and volume information on the disk and returns it to an unallocated state.
- *Please note that while this method is fast, it does not overwrite the actual data storage area, so it does not constitute “complete erasure.”
- Once you run this command, there’s no going back! You must carefully verify that the selected drive is correct.
Let’s take a look at the state of the SSD after deleting the partition
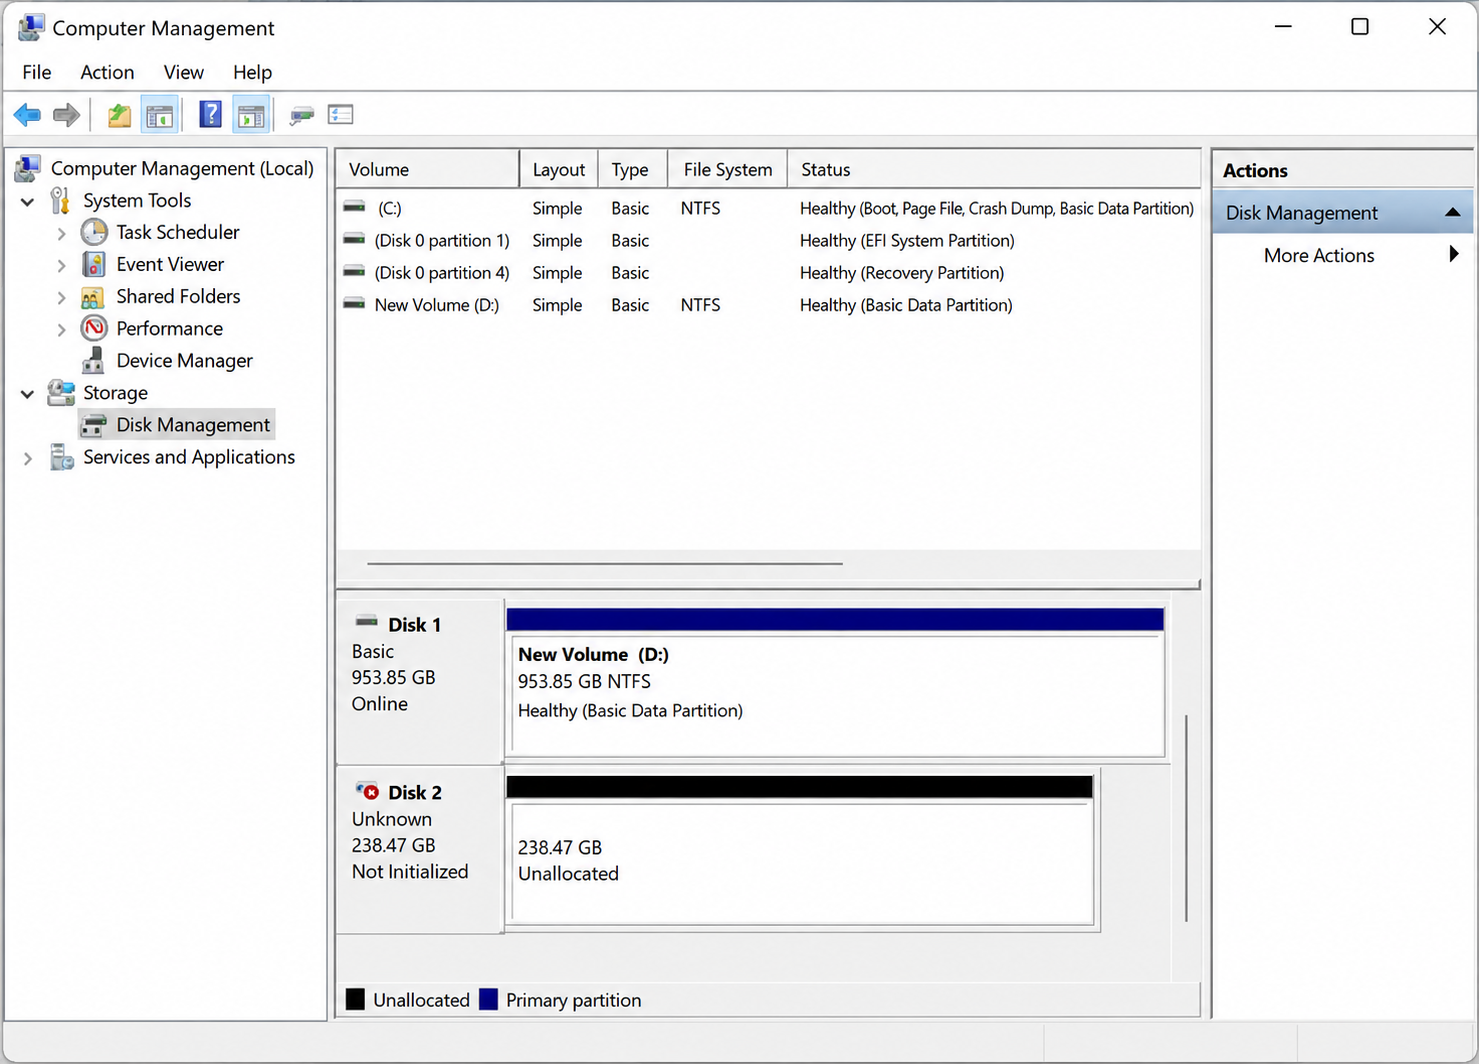
After deleting the partition on the SSD using DiskPart, when I check the SSD in Windows under “Computer Management” > “Disk Management,” it shows as “Not initialized.”
Try Secure Erase again using TxBench
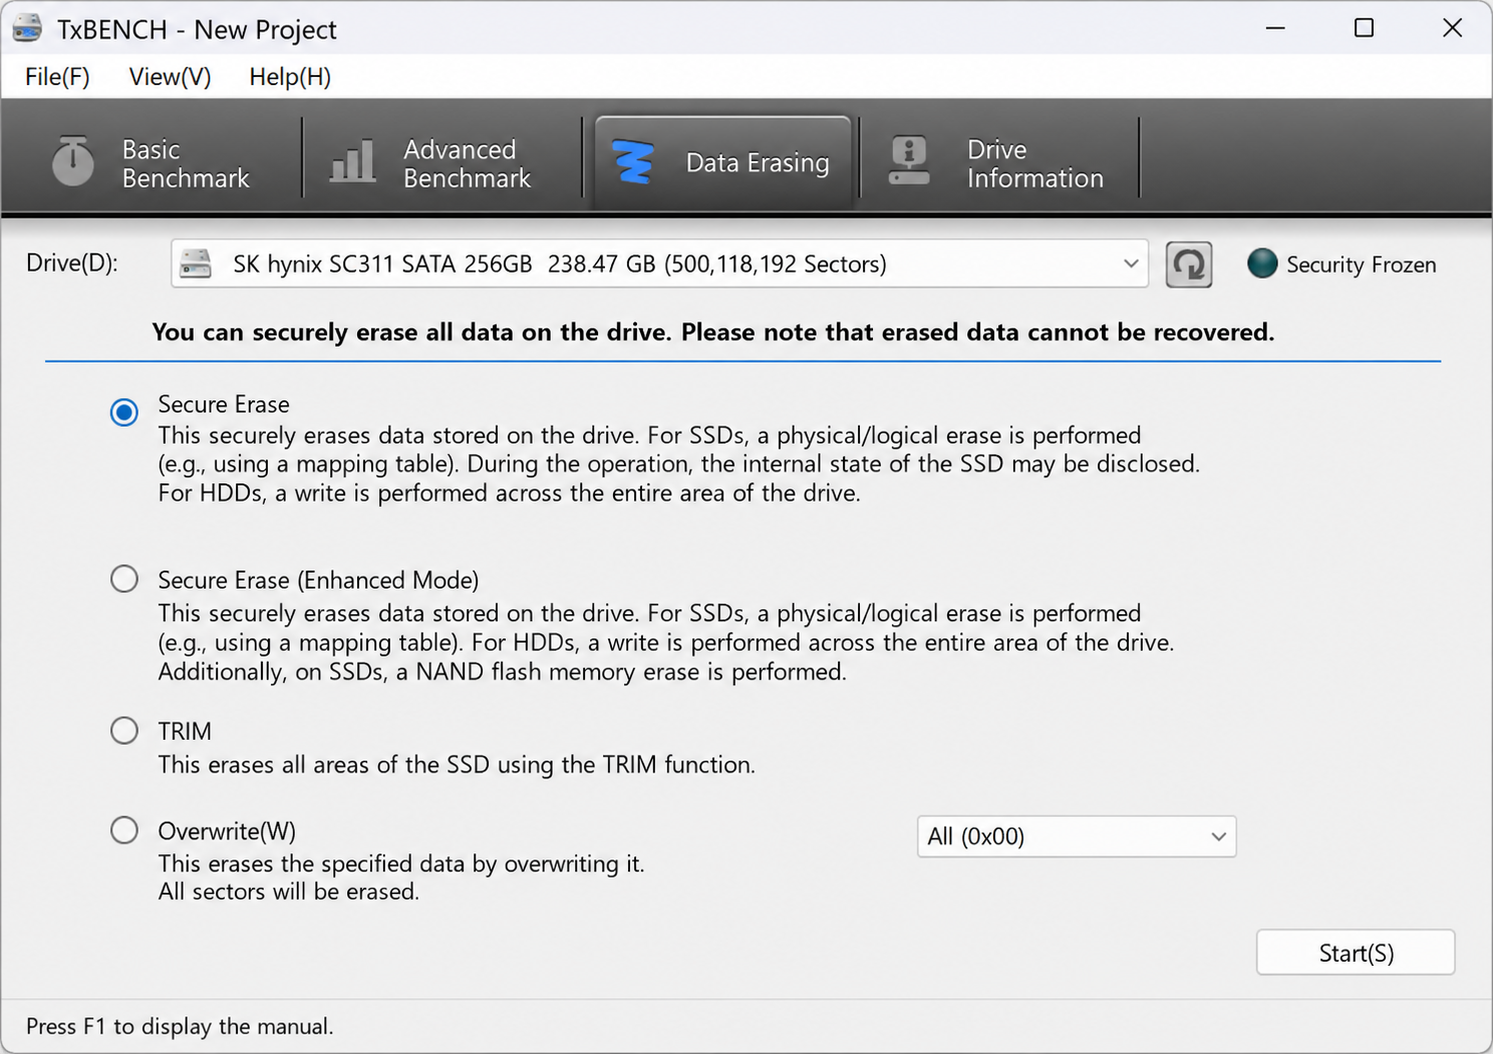
Launch TxBench again and try Secure Erase.
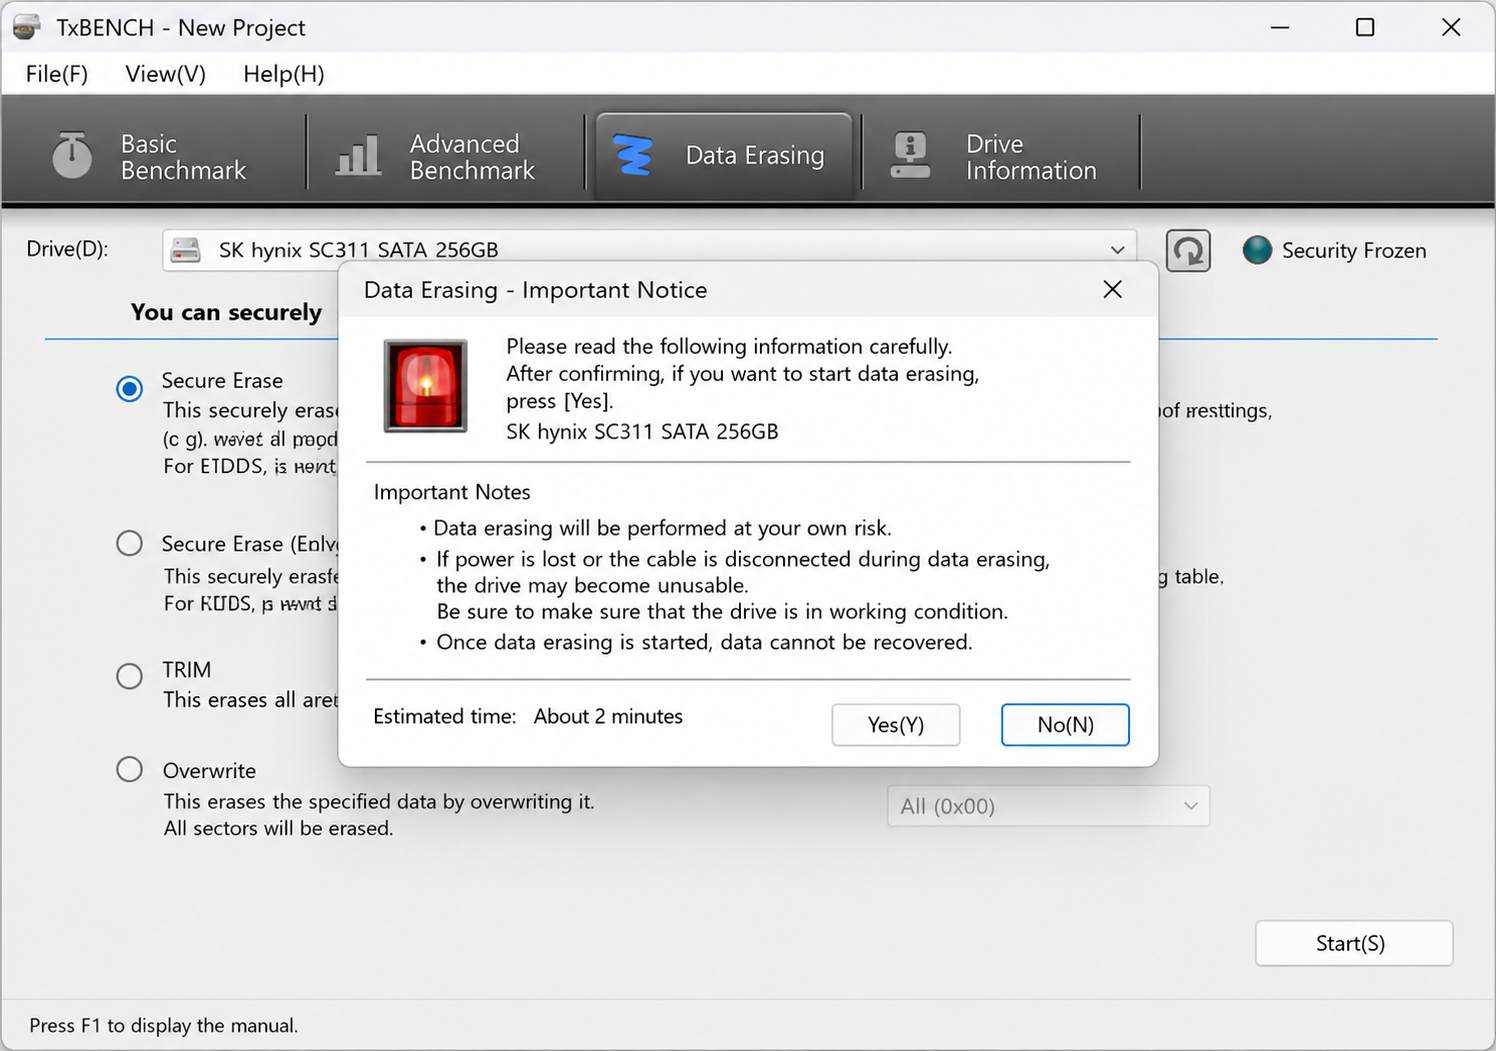
This time, I was able to move forward. Since this action cannot be undone once executed, several warnings are displayed. Click “Yes” to continue.
Final Confirmation Before Secure Erase
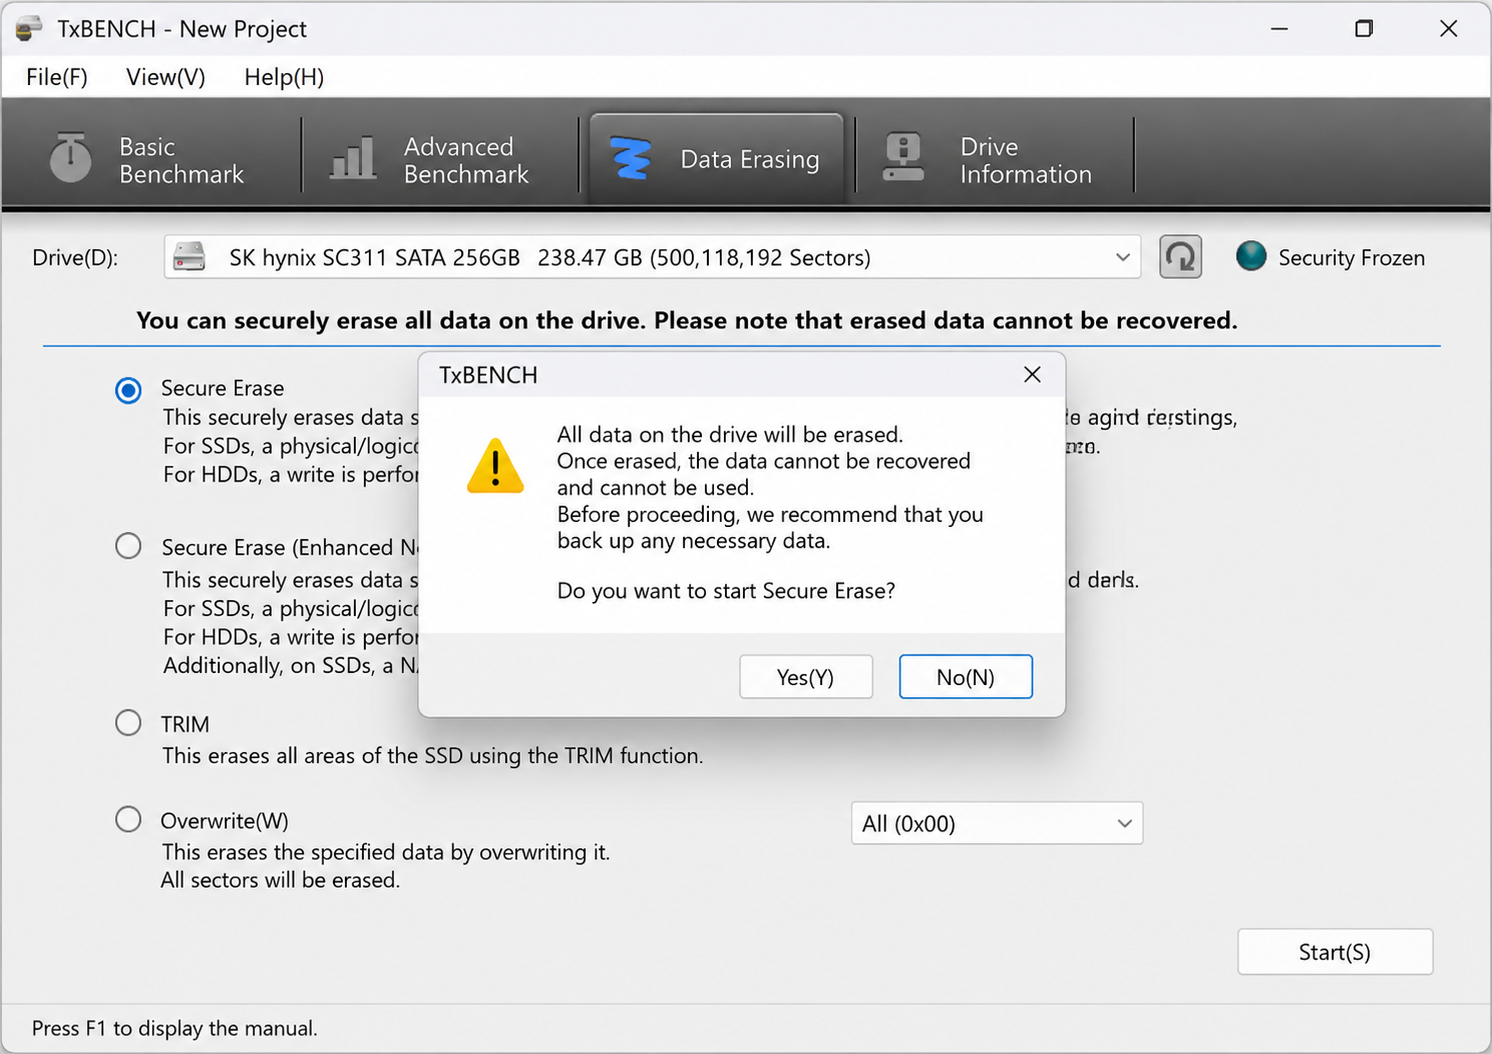
This is the final confirmation. A warning will appear stating, “All data on the drive will be permanently erased.” Click “Yes” to run Secure Erase.
Secure Erase Complete
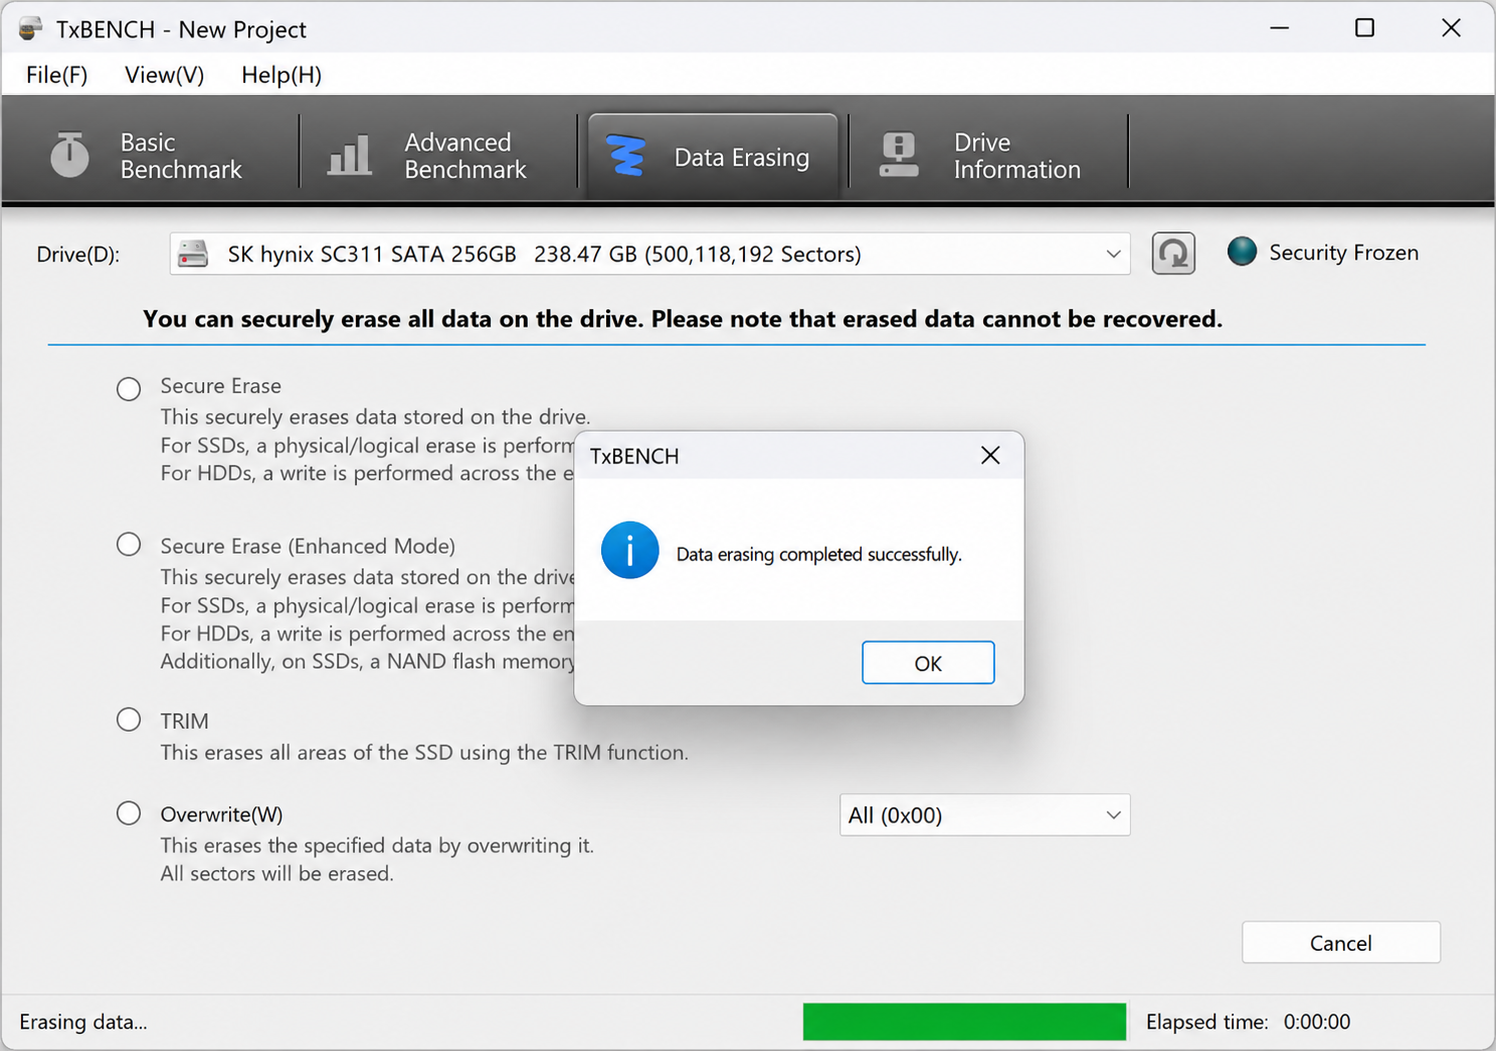
It said “Estimated time: approx. 2 minutes,” but in my case, Secure Erase was completed in just a few seconds.
I tried running a benchmark after performing a secure erase, but the only option available was “RAW mode.”
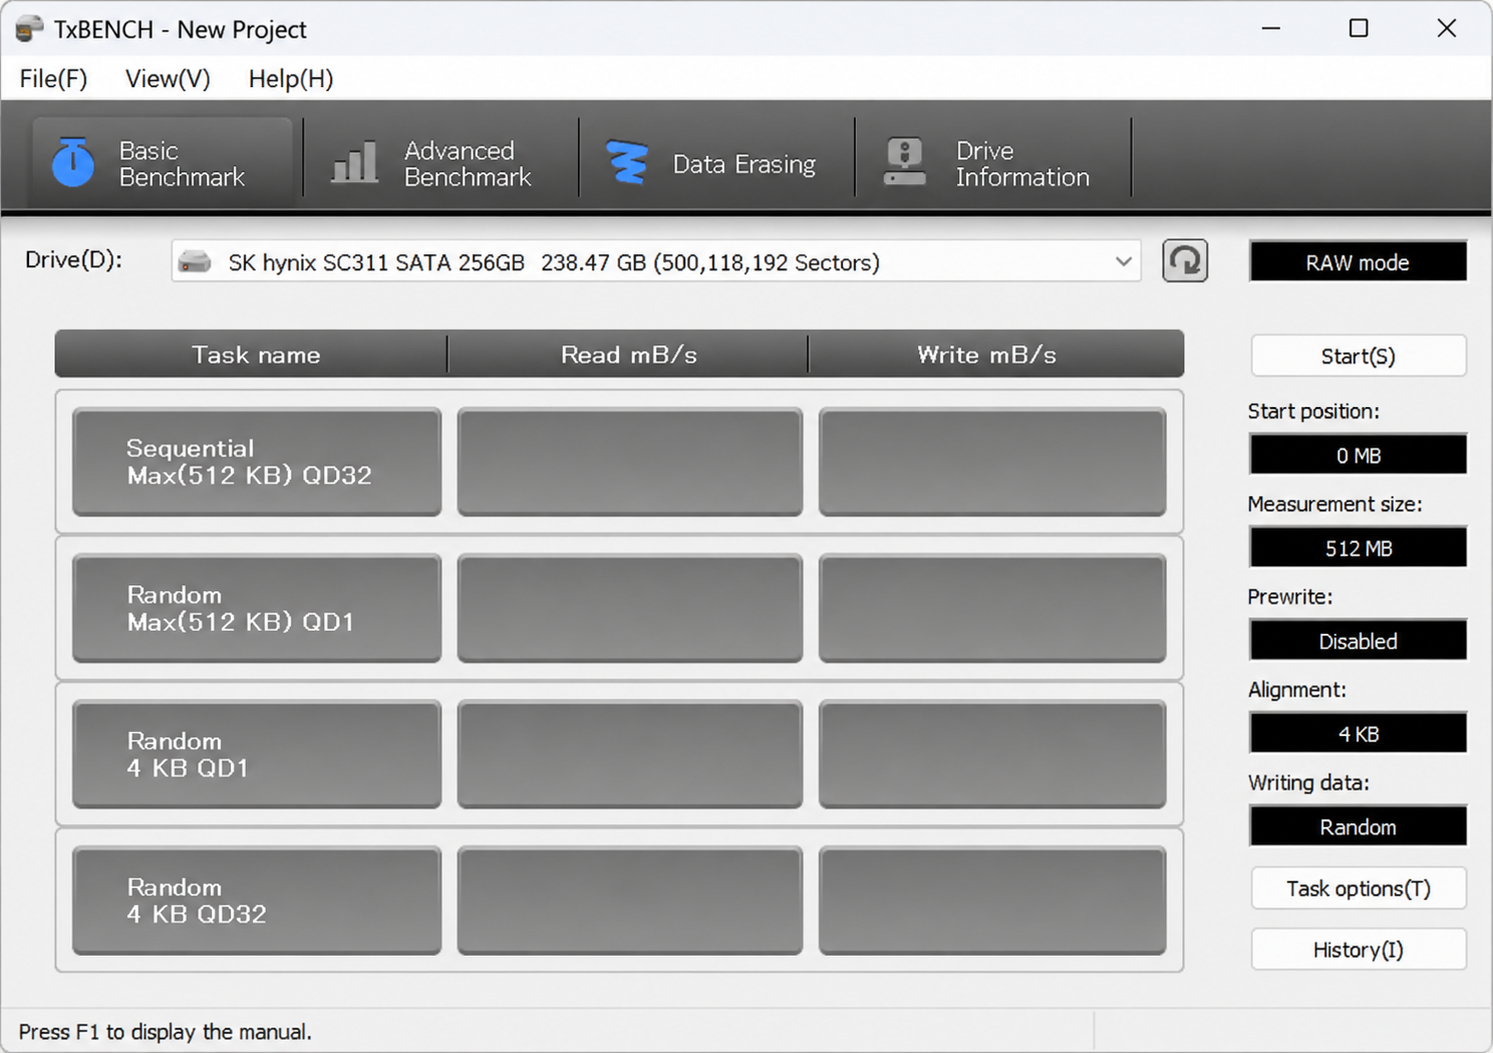
I tried running a benchmark after performing a Secure Erase, but since there is no volume on the SSD, the only option available is RAW mode. Since I ran the benchmark before the Secure Erase in FILE mode, I need to standardize the settings.
So, I’ll create a volume on Windows.
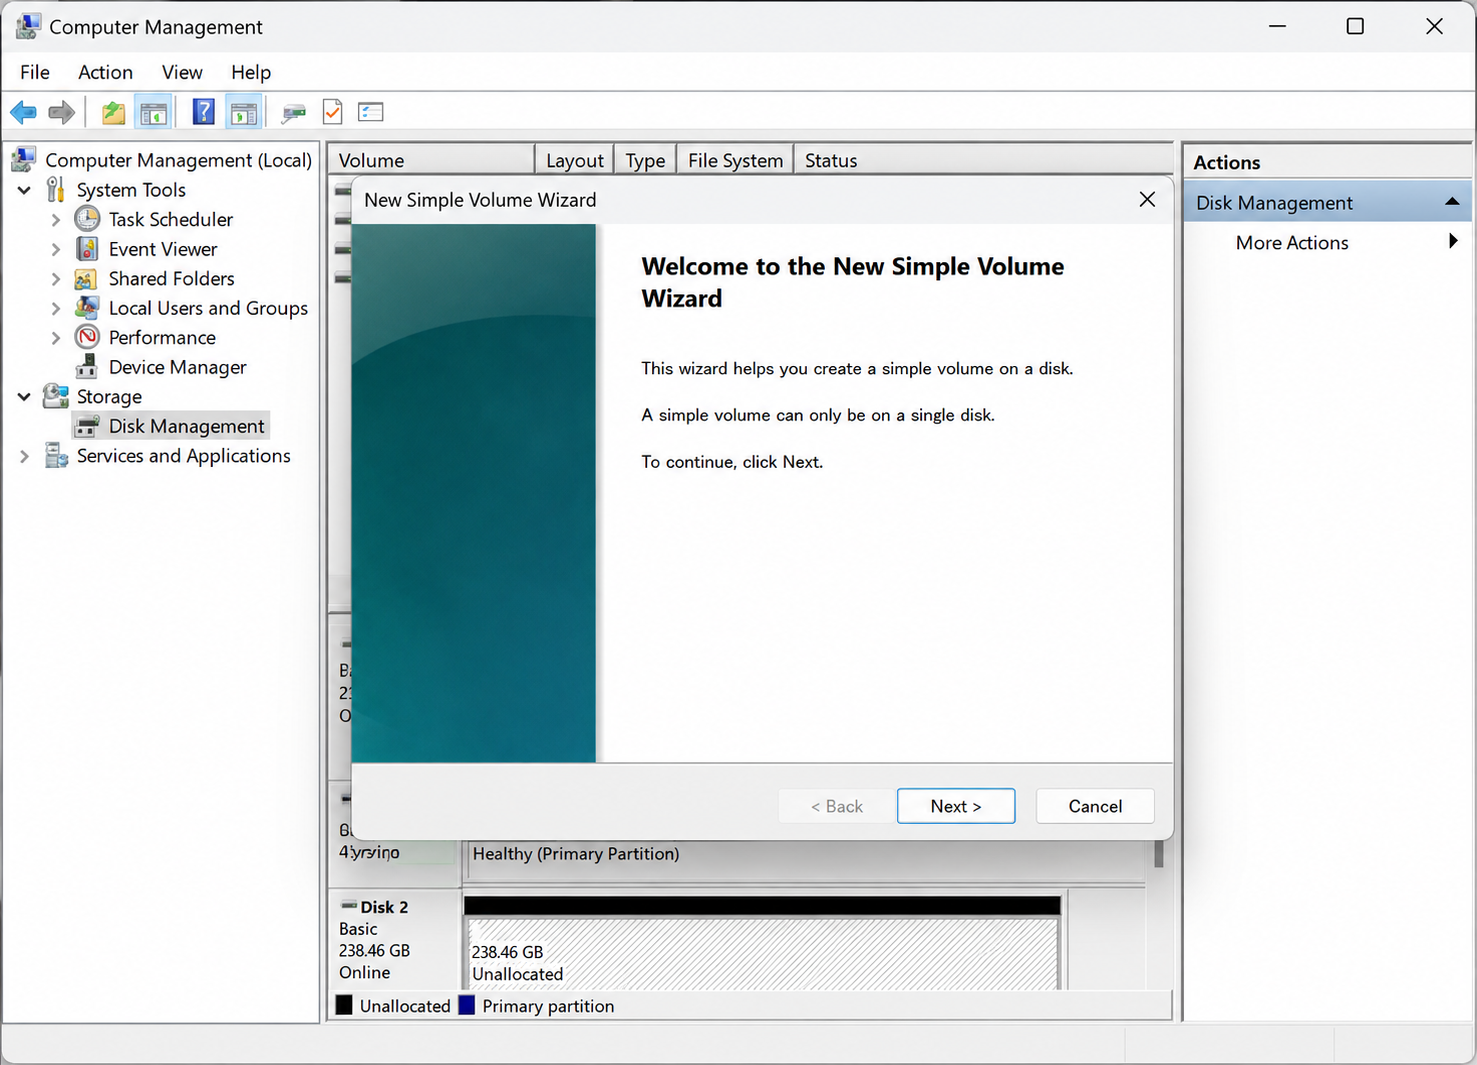
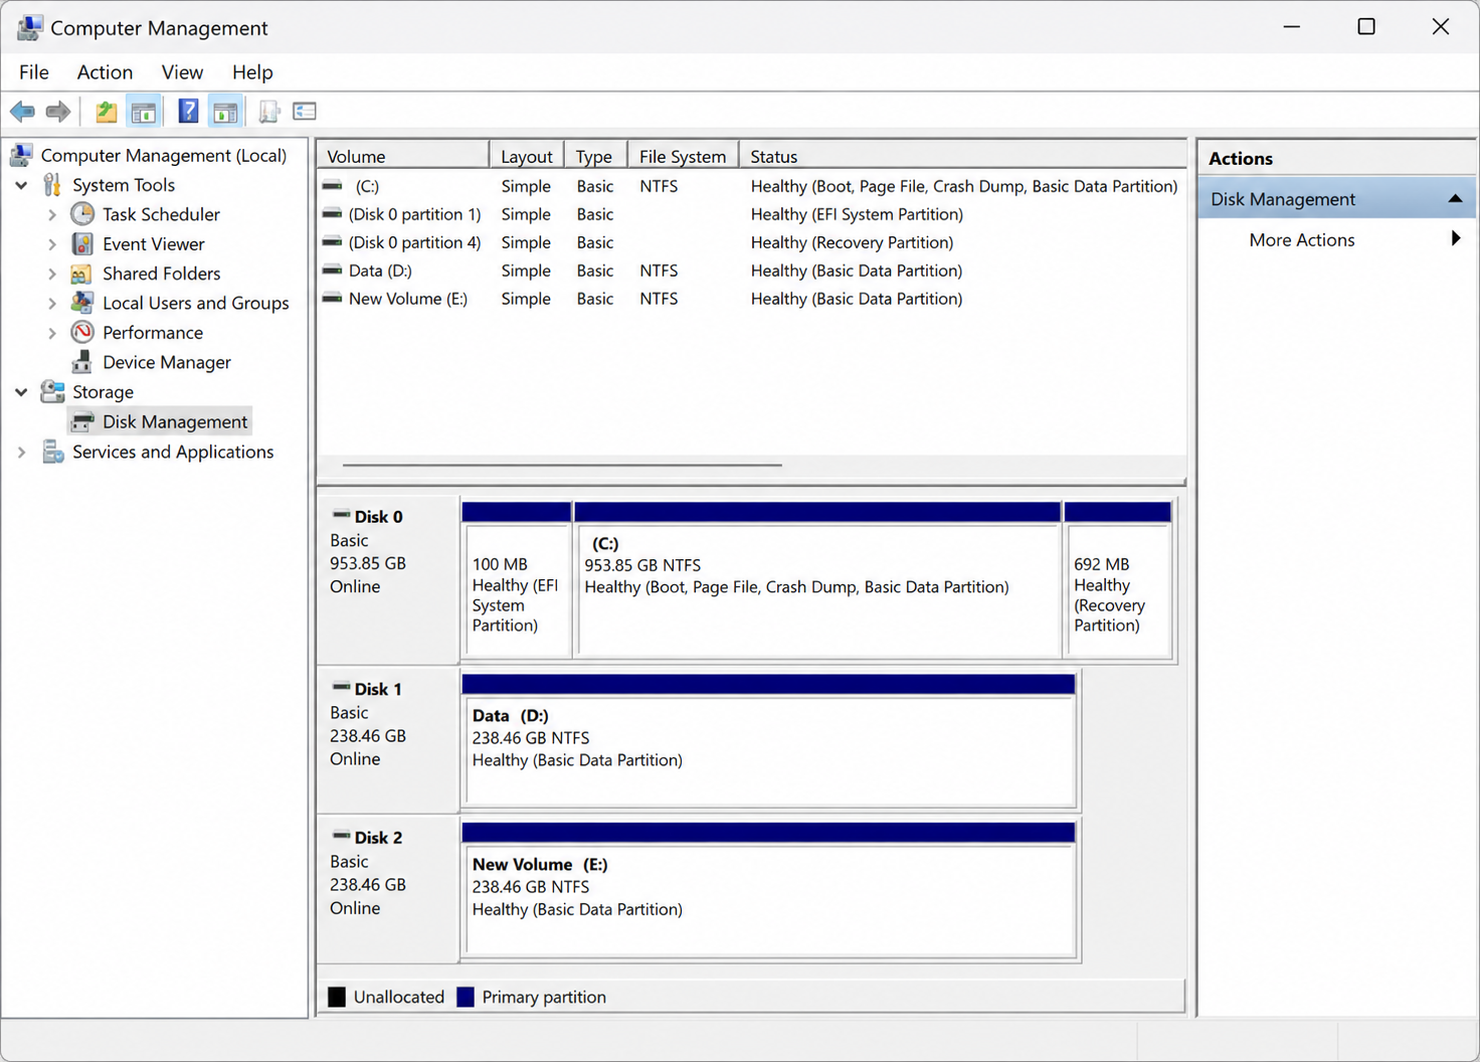
Run the benchmark again after creating the volume
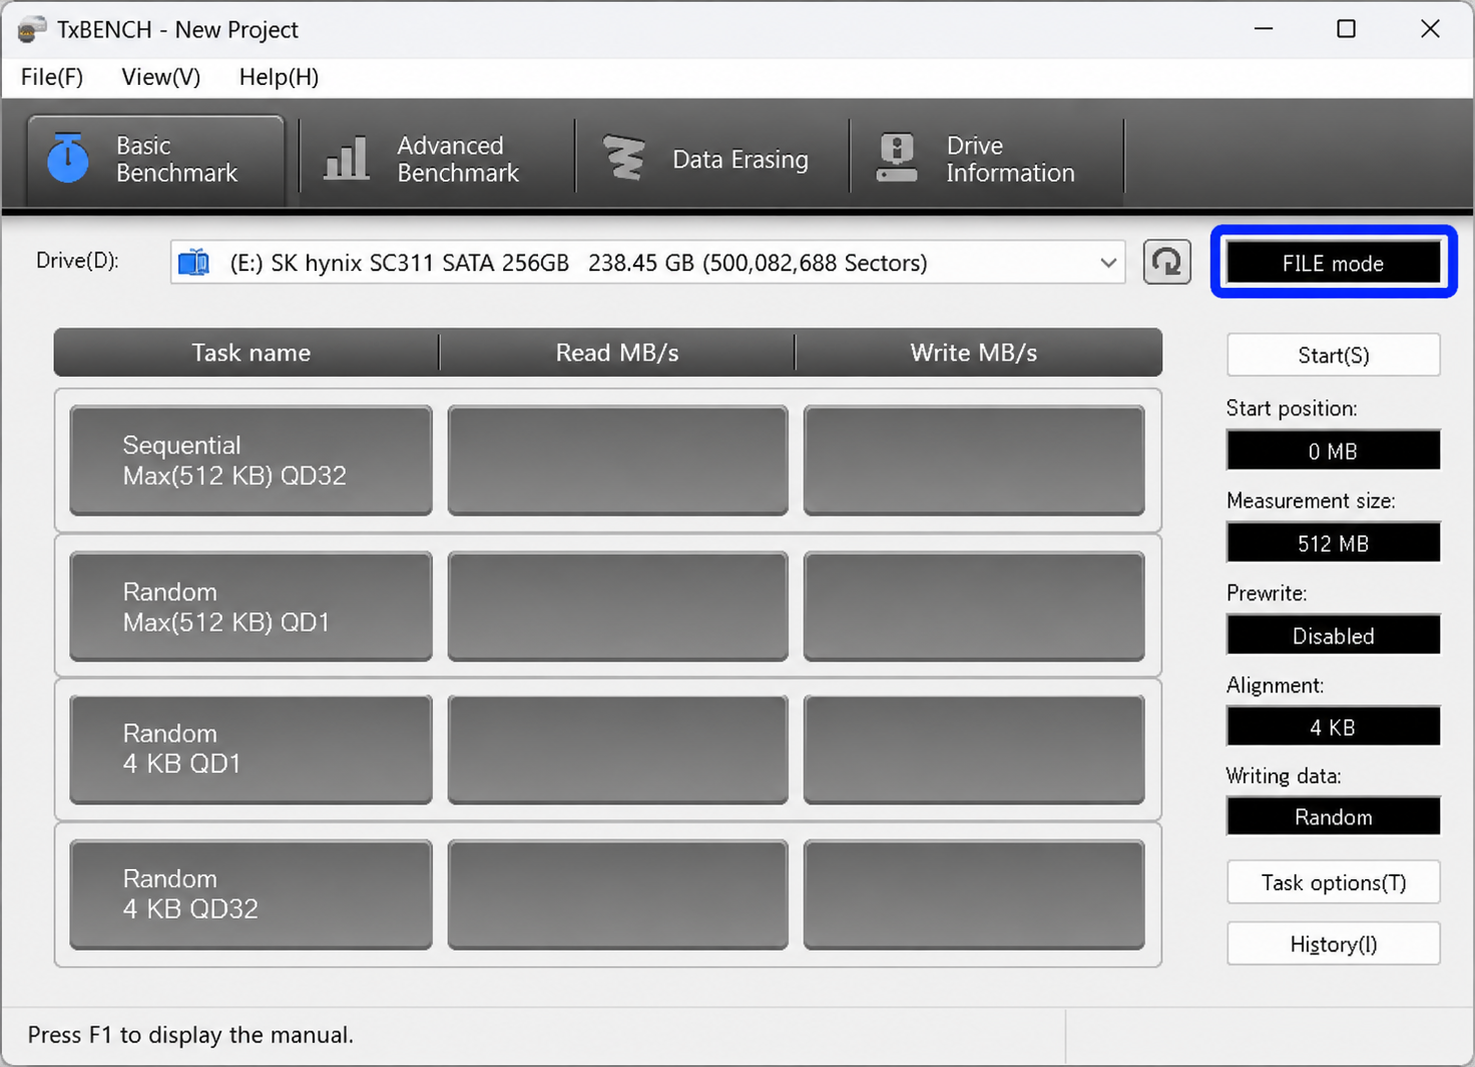
It looks like you can now select FILE mode. Click “Start” to run it.
Benchmark Comparison Before and After Secure Erase
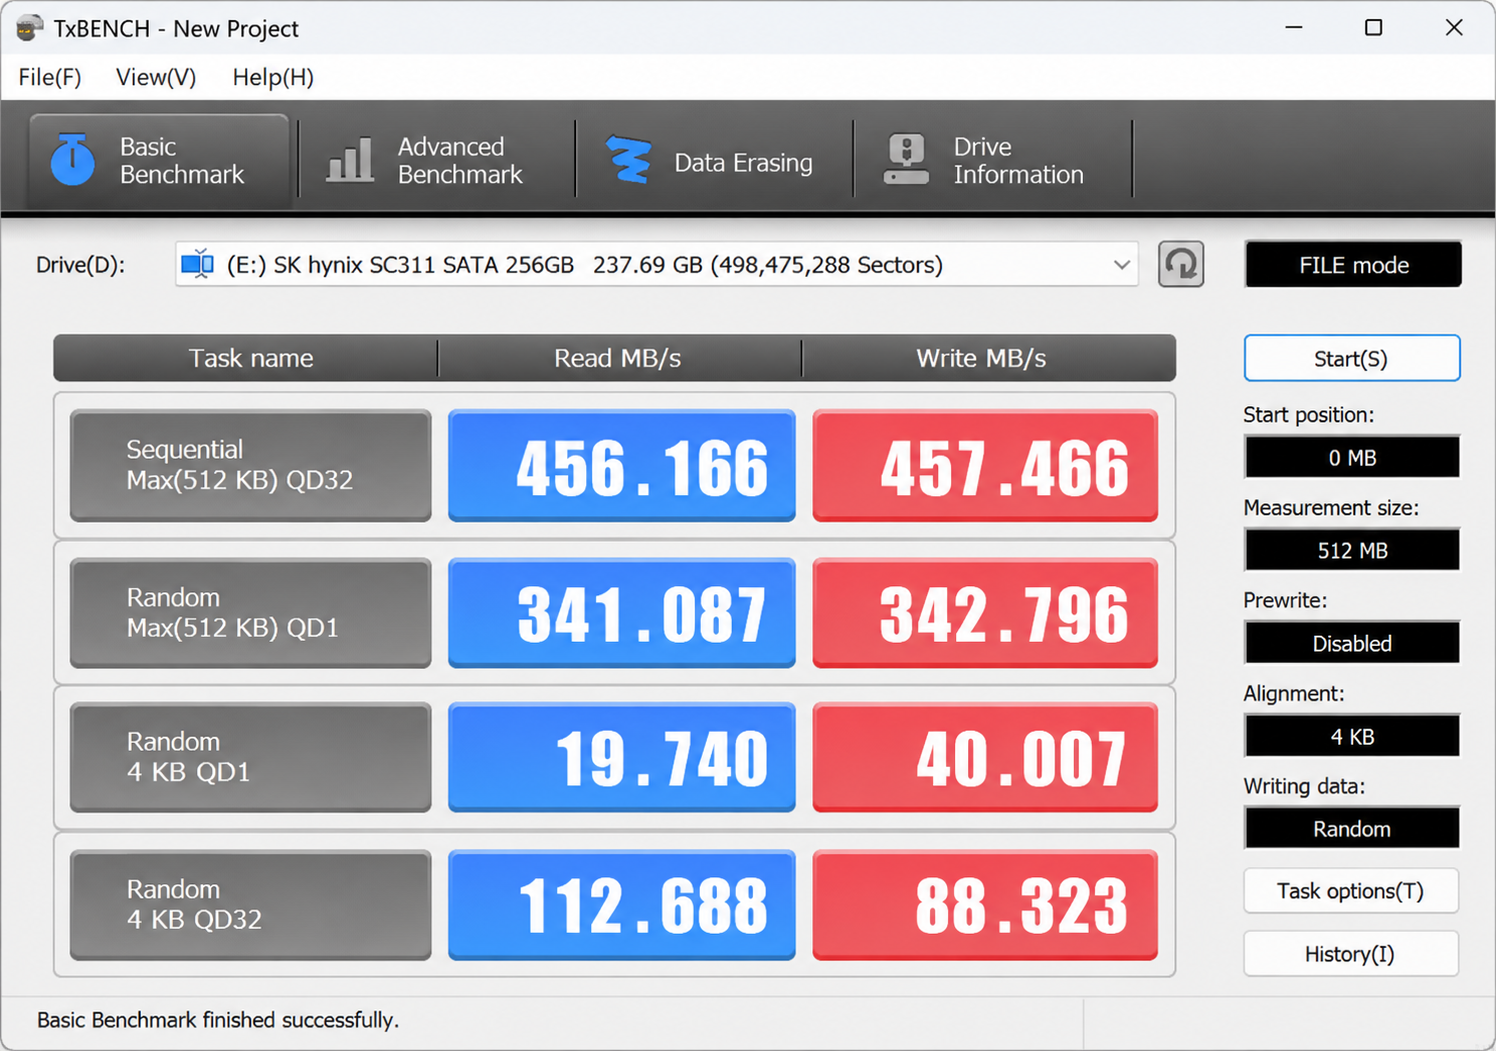
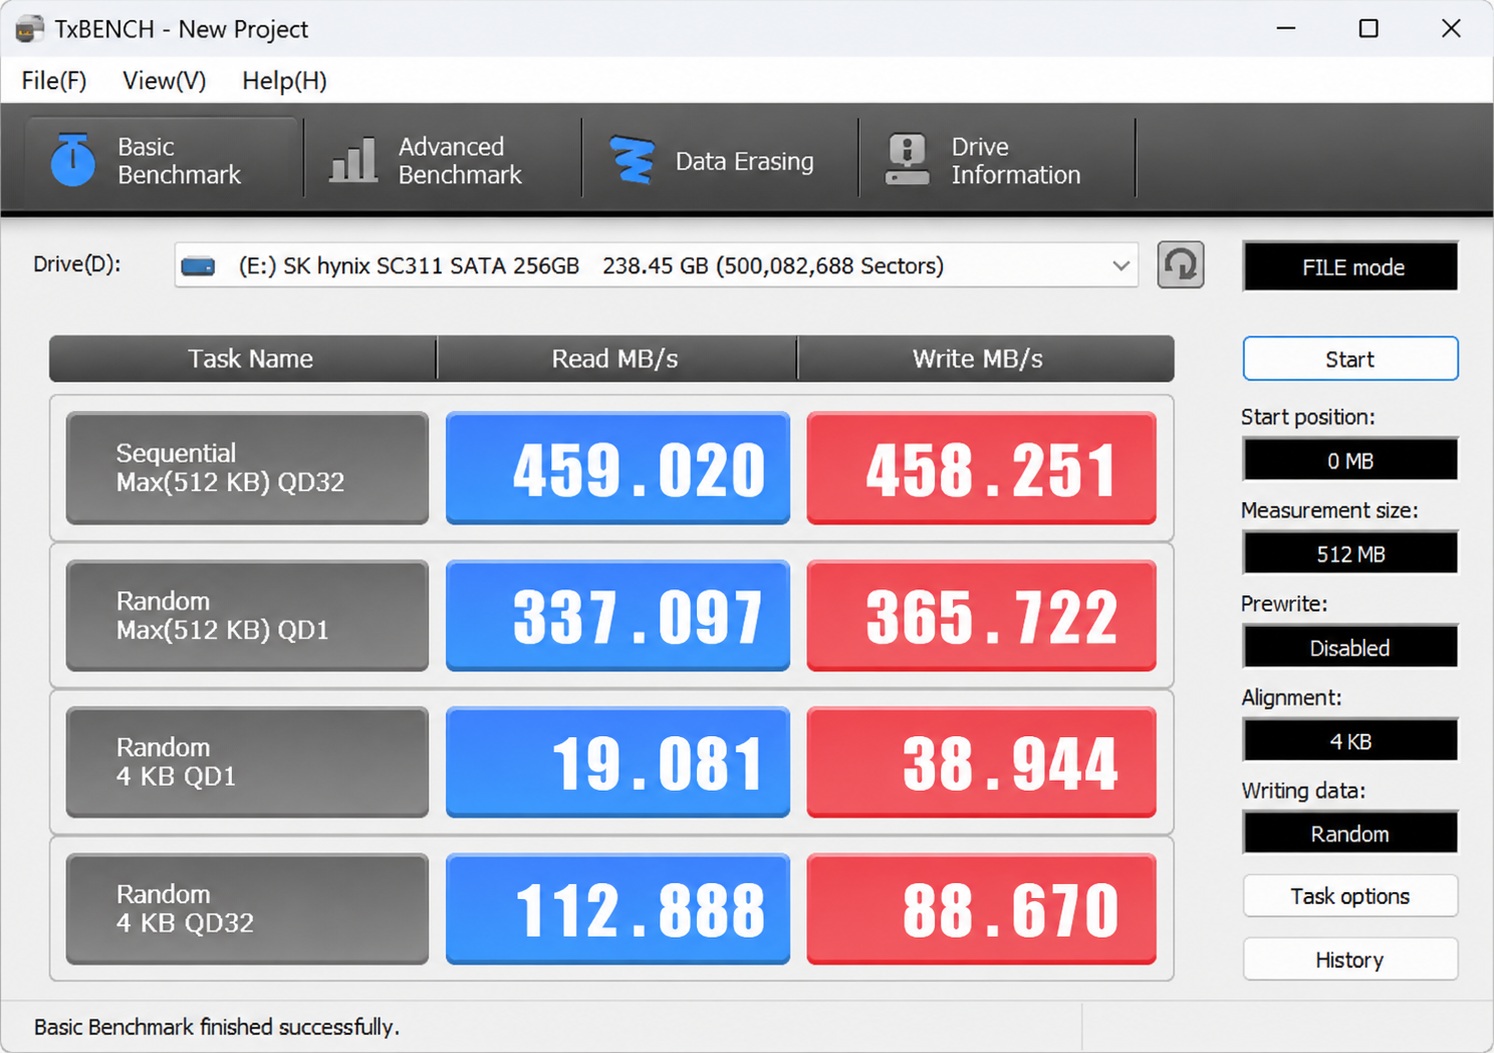
Here’s a benchmark comparison before and after Secure Erase. Hmm… the difference is… kind of subtle.
In Closing
In this article, I’ve summarized the steps for performing a Secure Erase on an SSD using TxBench to completely erase the data. Thank you for reading to the end.

Comment